Free shipping from 1 999 Kč
Fast shipping
Verified store
Thousands of customers




Free shipping from 1 999 Kč
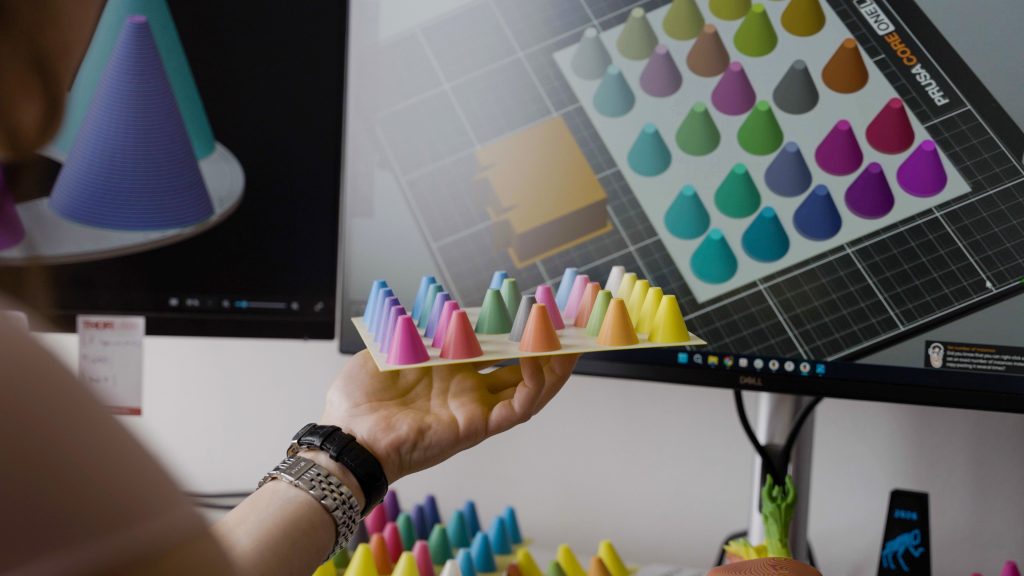
Multicolor FDM printing has long meant more than manually changing filament at a certain height. Multimaterial systems can switch between several spools, slicers allow you to color parts of a model, and the printer handles the changes. But there was still one clear limitation: a model could only have as many colors as you physically loaded into the printer.
At the time of release, ColorMix is available in PrusaSlicer 2.9.6 beta and EasyPrint, so it is primarily a feature intended for practical experimentation.
Prusa ColorMix pushes this limit further. Instead of printing each color from one specific spool, the slicer creates virtual shades by combining layers from multiple filaments. For example, when white and black alternate in thin layers, the surface looks gray from a normal distance. Similarly, cyan, magenta, yellow, white, and black can produce a range of additional colors, even if you do not have them physically loaded on separate spools.
This is not actual mixing of molten plastic in the nozzle. It is an optical trick. The colors are in layers above or next to one another so close together that the eye perceives them as a new shade from a normal distance. This is important because both the advantages and limitations of the technology depend on it.


ColorMix works with a multimaterial printer that can switch between multiple filaments. In the slicer, you enter the actual colors of the loaded spools, and additional virtual extruders are created from them. These do not correspond to a new physical spool, but to the layer ratio between the existing filaments.
A typical example:
In PrusaSlicer, these virtual shades are used similarly to regular extruders. You can assign them to part of a model, use them for multimaterial painting, or apply them to decorative surfaces. EasyPrint has a simpler browser-based workflow, making it suitable for quick experimentation and for users who do not want to deal with as many detailed settings.
An important practical note: ColorMix is not a smooth color blend like in a graphics editor. FDM printing works with discrete layers. Therefore, simple ratios such as 50:50, 75:25, 25:75, or 33:33:33 make the most sense. A finer ratio would require a longer repeating layer pattern, which can create visible striping on the model.
ColorMix works best on a printer with multiple materials or multiple tools. This typically means printers with an MMU, AMS, or toolchanger. With one spool and one nozzle without automatic filament changing, ColorMix does not make much practical sense because it requires frequent material switching.
A toolchanger has the advantage of speed and less waste because each filament can have its own tool. In single-nozzle systems, the hotend must be cleaned every time the filament is changed, increasing both print time and material consumption for a purge tower or waste. This may not matter for a small color detail, but with a model involving many changes on every layer, the difference quickly becomes apparent.
A CMYKW-style set is a good starting combination: cyan, magenta, yellow, white, and black. White helps lighten, black darken, and the CMY colors form the basis for a wider palette. You can also experiment with what you have at home. Just keep in mind that the result will depend heavily on the specific material.
More translucent filaments often mix optically better than highly opaque materials. On the other hand, metallic, glitter, pearlescent, or strongly effect-based filaments can disrupt the result because they reflect light differently depending on the orientation of the layers and particles. For a first test, ordinary PLA or PETG without special effects is the most sensible choice.
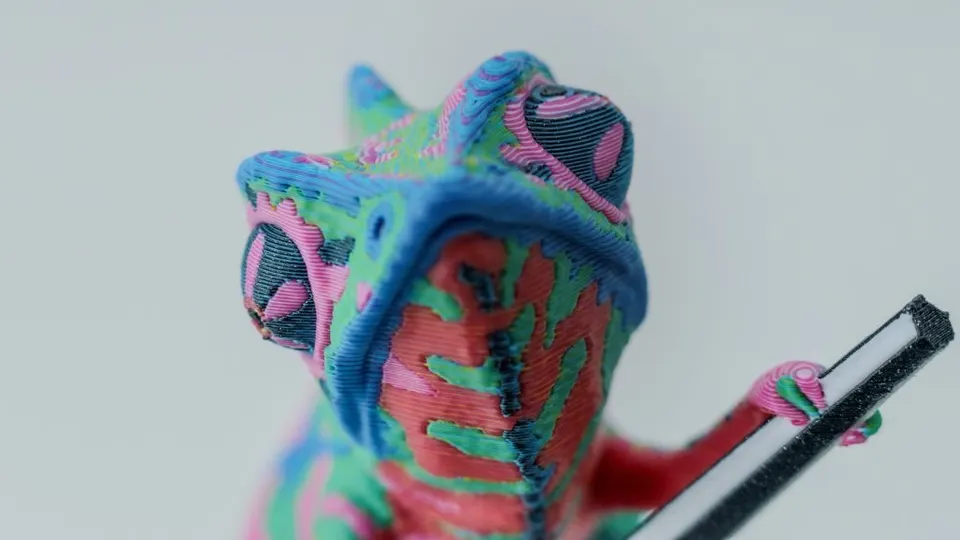

ColorMix is strongest where you view the model from the side and the thin layers blend into a single shade in the eye. In practice, this mainly means decorative models with visible vertical or diagonal walls.
Good candidates:
Imagine a small chameleon whose body is not just green, but has a lighter belly, darker back, and color transitions on its tail. Or a nameplate for a desk where the lettering stands out in a darker blended shade and the background has a soft pastel color. In such cases, ColorMix adds visual value without requiring you to buy ten different spools.
Its use for shaded models is also very interesting. When highlights and shadows are added directly through colors to a figurine or relief, the finished print can appear more three-dimensional even without additional painting. It is not a replacement for hand-painting miniatures, but it is a practical step forward for quick gifts, decorations, and appearance prototypes.
ColorMix's biggest limitation is accuracy. The slicer can estimate how a combination will look, but plastic is not ink and every filament behaves slightly differently. A different brand, translucency, pigment, or printing temperature can shift the result.
The second limitation is the orientation of surfaces. ColorMix works best on side walls, where the eye sees the layers as fine stripes. On top and bottom surfaces, the effect is weaker because you mainly see the last printed color or the top infill pattern. If the most important part of the model is a large, flat top surface, ColorMix may not produce the expected shade.
The third limitation is time and waste. More colors mean more changes. With a single nozzle, every change results in purging and additional material use. A toolchanger is better in this respect, but you still have to deal with tool calibration, alignment accuracy, and longer print preparation.
The fourth limitation is visible striping. With a lower layer height, the colors blend optically better. With a higher layer height or a high-contrast combination, the mix may be visible as an intentional layered pattern. Sometimes it looks interesting; other times it appears to be a mistake.
ColorMix is a great tool for expanding your palette, but there is no reason to discard traditional colored filaments because of it. An exact shade on a separate spool is still better in several situations.
Use a specific filament when:
A typical example is a custom sign in a company's specific red. If the customer requires an exact shade, it is safer to use a filament that matches the color as closely as possible than to rely on an optical mix. On the other hand, for a fantasy figurine, a colorful headphone stand, or a playful decoration, ColorMix may offer a better result than a randomly selected separate spool.
Start with a small model, not an all-day print. A test cone, small figurine, or sample with several surfaces is ideal. The goal of the first print is not a perfect model, but to verify how your specific filaments behave.
Recommended procedure:
If you use a single-nozzle system, also monitor the size of the purge tower and overall material consumption. Sometimes it is worth removing one virtual shade because the savings in time and waste are greater than the visual difference.
Prusa ColorMix is most interesting for people who want to get more colors from a multimaterial printer without buying a large stock of spools. It works best on decorative models, figurines, nameplates, gaming accessories, and anywhere a pleasing color impression is more important than absolute shade accuracy.
However, it is not a magical replacement for actual filament in a specific color. If you need an exact brand color, a perfectly clean uniform surface, or fast printing without waste, a traditional spool still wins. Think of ColorMix as a new tool in your toolkit: excellent for experiments, shades, and visually interesting models, but less suitable for orders with precise color specifications.
For an e-shop or home workshop, this leads to a simple rule. Handle precise and repeatable colors with a specific filament. Try blending creative models, color-variant prototypes, and eye-catching gifts in the slicer.


