Free shipping from 1 999 Kč
Fast shipping
Verified store
Thousands of customers




Free shipping from 1 999 Kč
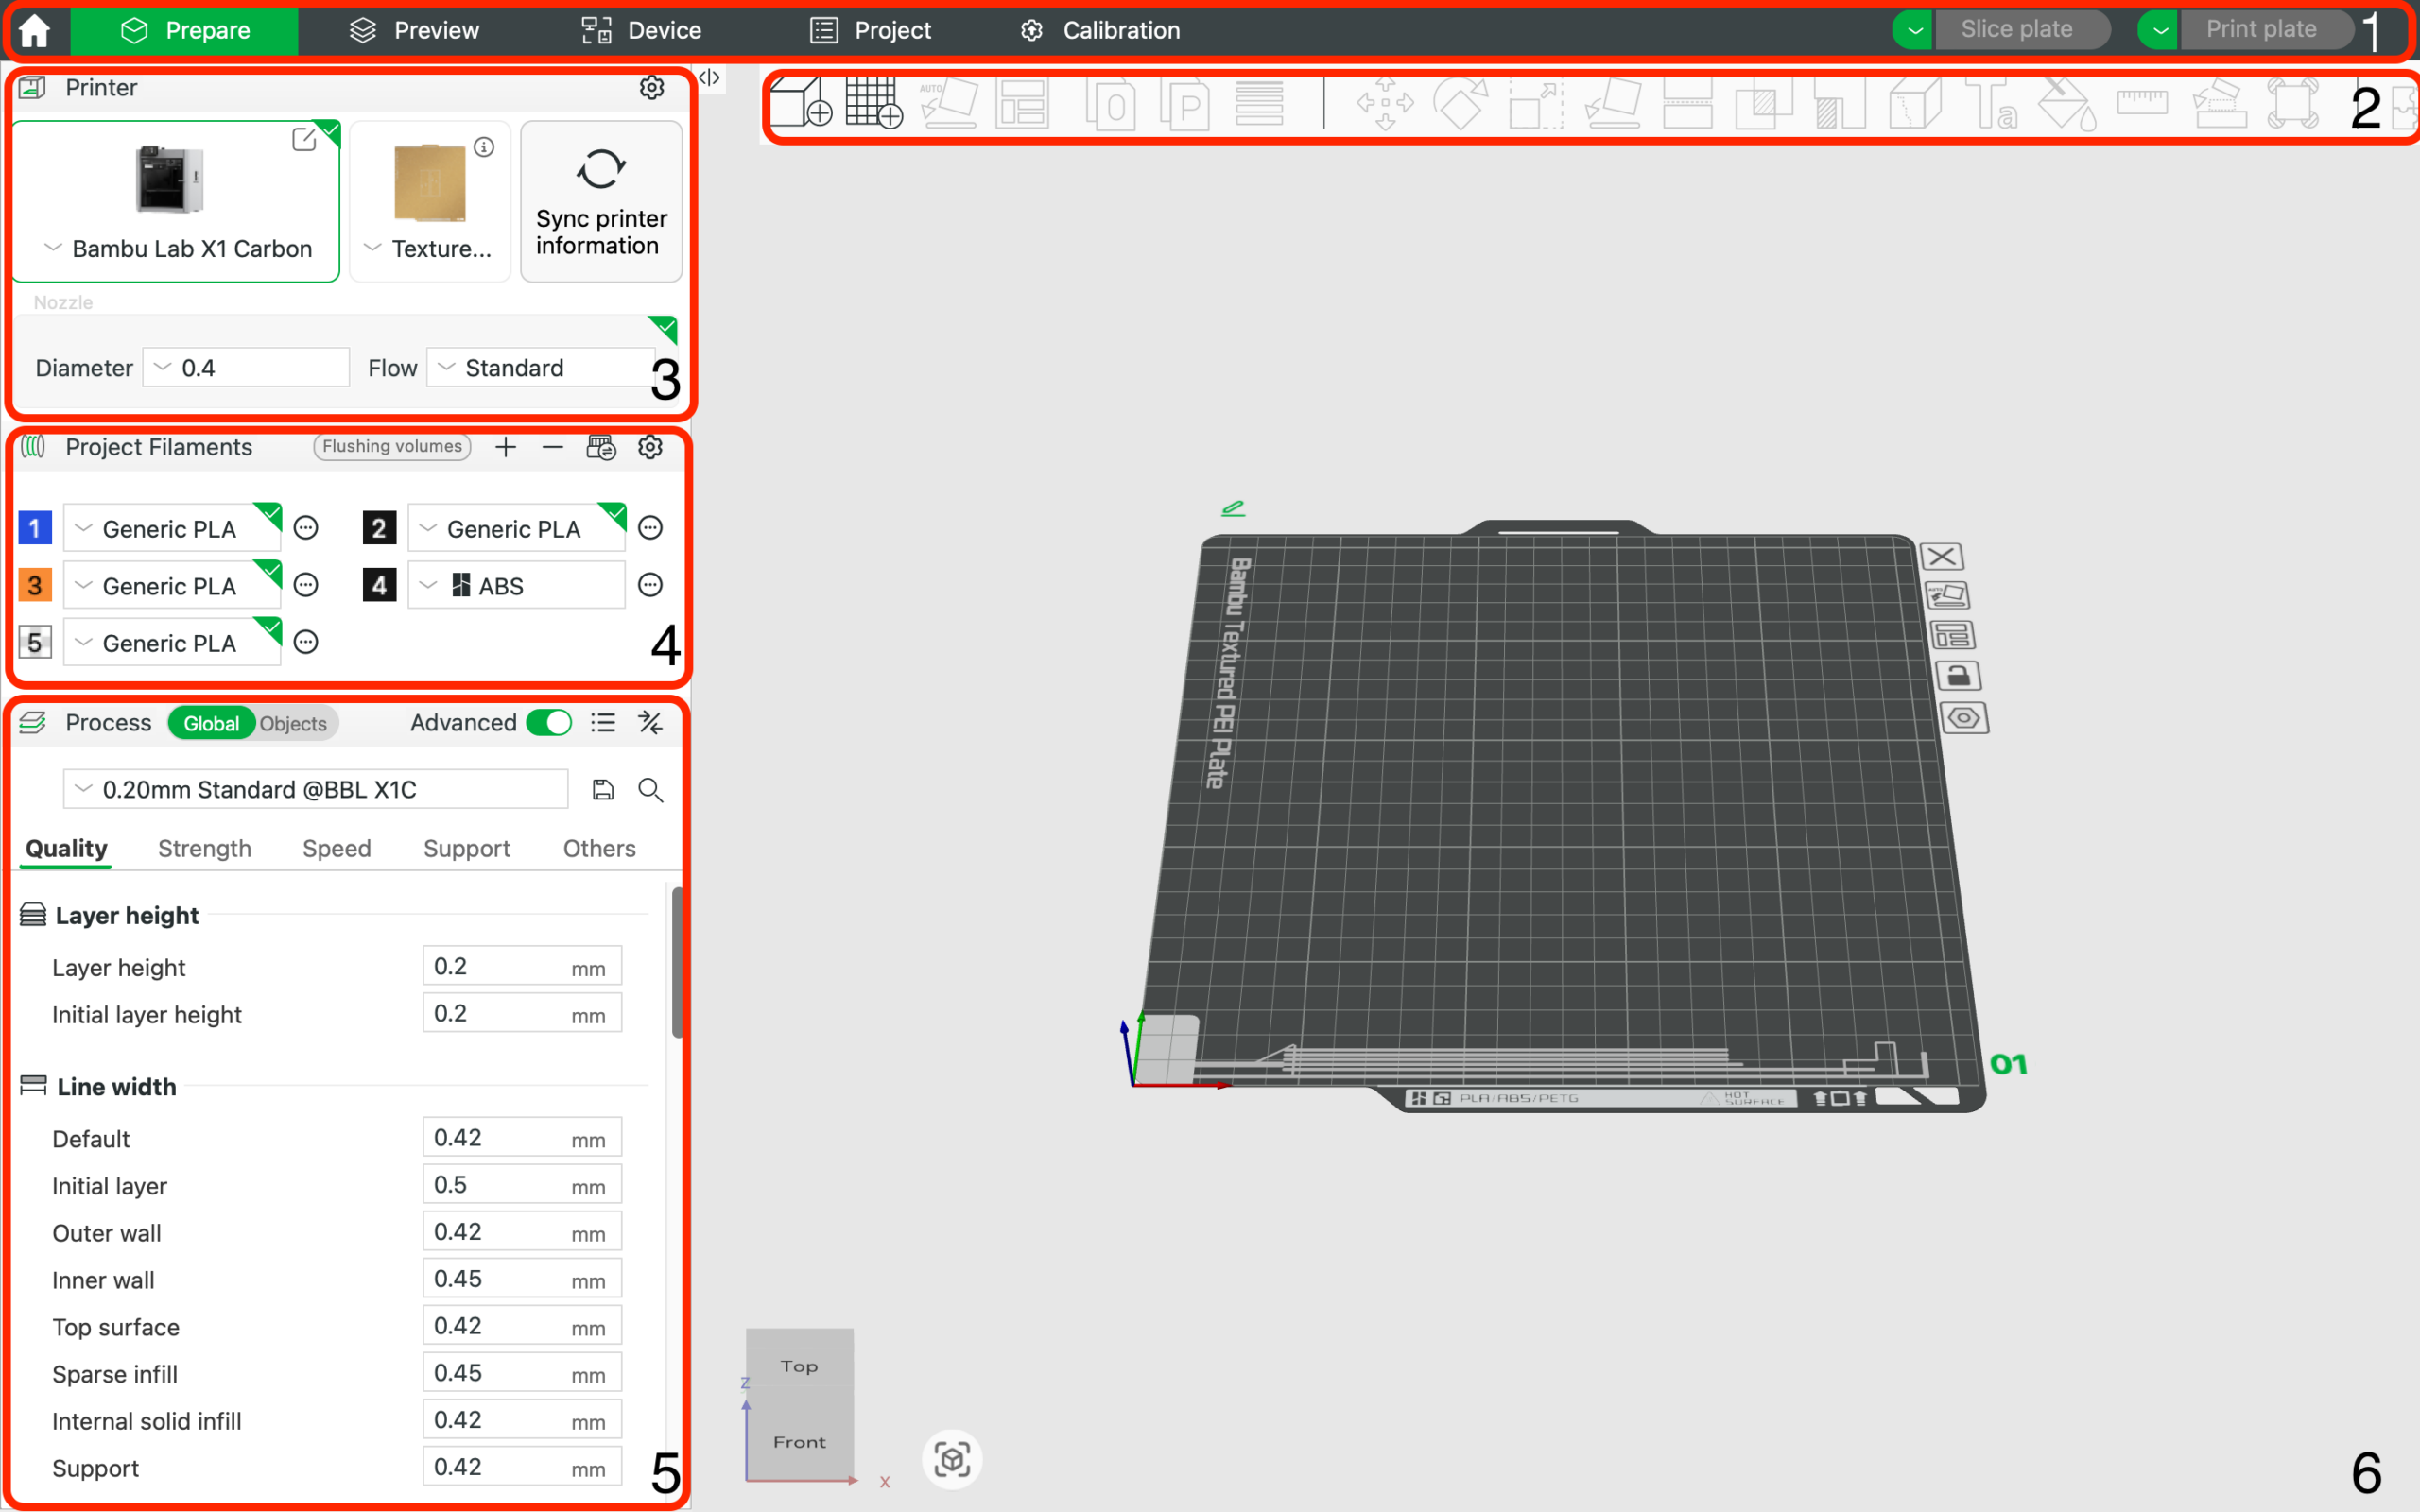
Bambu Studio is the slicer where most of the things you will later see on the print are decided: layers, speed, temperatures, cooling, supports, filament flow, seam, infill and multicolor printing. Bambu Lab printers automate a lot, but a good result still does not depend only on pressing the “Slice” button.
The biggest difference is usually made by correctly choosing the printer, plate and filament profiles, followed by flow calibration and sensible work with speed. Once you learn what to change in Bambu Studio and what to leave alone, you will get cleaner walls, more accurate dimensions, less stringing and a more reliable first layer.
This guide is a practical procedure for regular users of Bambu Lab printers. It is suitable for the A, P and X series, and most of the principles also apply to other printers supported in Bambu Studio.
Before tuning, check three things:
If you are printing with a 0.4 mm nozzle but have a profile for 0.2 mm or 0.6 mm selected in the slicer, calibration will not help. Likewise, a PLA profile will not be ideal for PETG, ASA or TPU. Bambu Studio uses a combination of printer, process and filament profiles. Each of them affects something different:
A good practice is to start with the default profile and save your own copy only once you know why you are changing a specific value. Do not overwrite default profiles chaotically. It is better to have profiles such as “PLA 3D tisk CZ – lesklé” or “PETG černé – pevnost” and be able to tell from the name what each profile is for.
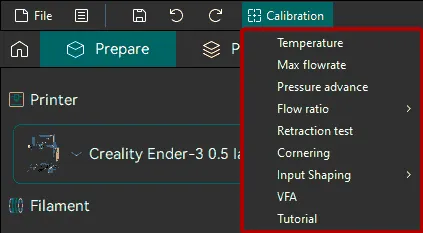
When you open a new spool, proceed simply:
This will save you a lot of random trial and error. If you start changing temperature, speed, flow and retraction all at once, you will not know which change actually helped.
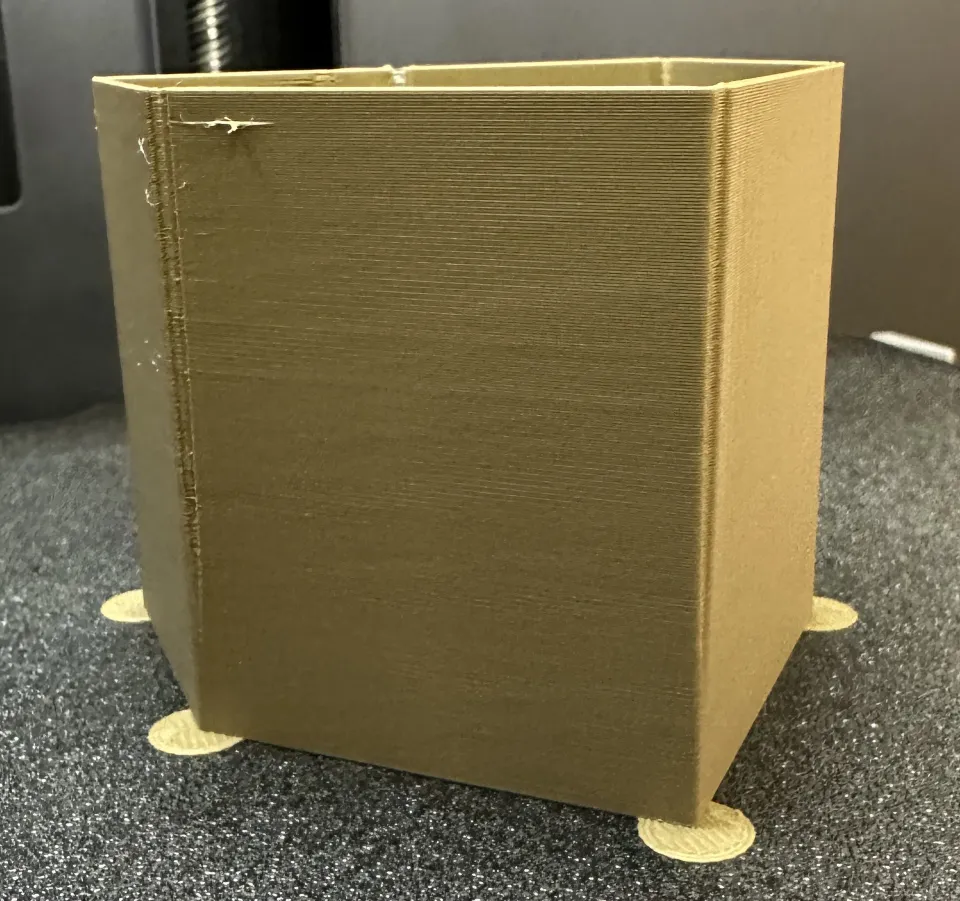
Flow Dynamics is a calibration that sets how the slicer compensates for the pressure of molten filament in the nozzle. It is often referred to as pressure advance or the K factor. In practice, it mainly ensures that the printer does not over-extrude material in corners while also avoiding under-extruded line starts.
Typical signs of incorrectly set Flow Dynamics:
Start the calibration in Bambu Studio through the calibration tools. With some printers and firmware combinations, both automatic and manual options may be available. If the printer supports automatic calibration, it is a convenient starting point. Manual calibration is useful when you want to save the result to the filament profile and use it repeatedly.
Flow Dynamics is mainly worth doing when changing the filament, brand, color, nozzle, printing temperature or maximum volumetric flow. With the same spool, you do not need to repeat it before every print if the results are stable.
Practical example: you are printing PLA with a fast profile and the corners of small technical parts are slightly swollen. Do not start by halving the speed. First check Flow Dynamics, because the problem may be pressure compensation rather than the printer’s mechanics.
Flow Rate addresses something different from Flow Dynamics. While Flow Dynamics tunes behavior during the acceleration and deceleration of extrusion, Flow Rate determines the total amount of material extruded. In the filament profile, it appears as a flow ratio.
You can recognize an incorrect Flow Rate as follows:
For a new filament, I recommend doing Flow Dynamics first and Flow Rate afterwards. The reason is simple: if the printer behaves incorrectly when nozzle pressure changes, it can also distort the visual evaluation of the flow.
When manually evaluating Flow Rate, do not look only at the nicest part in the center of the cube. Examine the top surface under side lighting. The ideal setting has connected lines, but they should not be flooded. If the surface looks plowed up, the flow is too high. If you can see fine gaps between the lines, it is too low.
Nozzle temperature affects gloss, layer strength, stringing, overhangs and maximum speed. The default profile is usually a good starting point, but filament brands differ. Even two colors of the same PLA can behave slightly differently.
Use small increments, typically 5 °C. If PLA strings, try going lower. If the layers are brittle or the perimeters do not bond properly, try going higher. With PETG, it is often important to find a compromise between strength and stringing. With ASA and ABS, pay particular attention to a stable environment, the chamber and limiting drafts.
Guidelines for common materials:
| Material | What to tune first | Typical problem |
|---|---|---|
| PLA | Flow Dynamics, Flow Rate, cooling | stringing, glossy blobs, weaker overhangs |
| PETG | temperature, flow, cooling | hairs, stuck supports, rough top surface |
| TPU | speed, flow, drying | irregular extrusion, stringing |
| ASA/ABS | temperature, chamber, cooling | warped corners, layer cracking |
| PA/nylon | drying, temperature, flow | bubbles, weak layers, unstable surface |
Remember that wet filament can mimic incorrect slicer settings. If you hear popping, see bubbles or the surface is matte and porous, dry the filament first.

Bambu printers are fast, but every filament has a limit on how much material can be melted and extruded in time. In Bambu Studio, this is handled by the maximum volumetric flow value. If the limit is too high, the slicer will allow speeds that the hotend or the specific filament cannot handle.
Signs of excessive volumetric flow:
If you are addressing strength, do not look only at print time. Fast printing may look good, but the part will be weaker because the layers bond less effectively. For technical parts, it often helps to reduce the maximum volumetric flow or use a more conservative process profile.
Practical example: a PETG bracket has a nice surface but cracks at the point of stress. Instead of increasing infill from 25 % to 60 %, first try reducing the speeds, increasing the temperature by 5 to 10 °C and checking that the filament is not damp.
The first layer determines whether the print will finish at all. Bambu Studio lets you select the plate type and adjusts the temperatures and first-layer behavior accordingly. Always check that the plate selected in the project matches what is physically installed in the printer.
When the first layer does not stick:
When the first layer is squashed too much, the bottom edge of the part is usually wider. For precise technical components, first-layer compensation or a small adjustment to the model design can help. Do not solve this by excessively prying the model off the plate, as you could damage the plate surface.
The most common combination is a 0.4 mm nozzle and a 0.2 mm layer height. It is fast and versatile. For more detailed models, you can use 0.16 mm or 0.12 mm. For large functional parts, 0.24 mm or 0.28 mm can make sense, if the profile and geometry allow it.
A lower layer does not automatically mean a better part. You get a finer surface in the Z direction, but printing takes longer and other defects, such as overheating of small details, may become more pronounced. A higher layer shortens the print, but requires a higher material flow and can worsen overhangs.
For practical decisions:
Bambu Studio has several support types, including tree supports. Before enabling supports for the entire model, try rotating the model. Often, simply changing the orientation by 45 or 90 degrees makes the supports almost disappear.
With supports, pay particular attention to:
If you have an AMS, using PETG as a separation layer for PLA, or vice versa, is very tempting. It works well because the materials bond less strongly to each other. However, expect longer print times and greater consumption due to purging. For a single small support contact, it often does not make sense. For a complex model with a large contact area, it does.
If a support is difficult to remove, do not immediately increase the gap dramatically. An excessively large gap will worsen the bottom surface of the model. Change the values gradually and print a small section of the problematic area.
A visible seam is a normal feature of FDM printing. Bambu Studio allows you to influence where the seam is placed. For decorative models, hide it on the back or in a corner. On cylindrical parts, random placement may be better, but only if you do not mind small dots around the perimeter.
For cleaner walls, the following helps:
The top surface is mainly tuned through flow, the number of top layers and the infill pattern. If the top surface has gaps, add top layers or increase the infill density beneath it. If it is rough and over-extruded, check Flow Rate.
Functional parts usually need more walls, not just more infill. Instead of 2 walls and 50% infill, try 4 walls and 25 to 35% infill. You will often get a stronger and cleaner part without unnecessary extra time.
With AMS, the most important things are assigning the filaments correctly and not underestimating purging. Bambu Studio makes multicolor printing very convenient, but physics cannot be bypassed. When switching from black to white, you need significantly more purging than when switching between similar colors.
Practical tips:
Newer versions of Bambu Studio also add features for blending and controlling color transitions. Treat them as advanced tools. For an important job, always print a small sample first, because the color preview may not exactly match the result with a particular filament and geometry.
First dry the filament, especially PETG, TPU and nylon. Then lower the temperature by 5 °C and check whether the flow is unnecessarily high. With very glossy filaments, slightly slower printing may help.
Run Flow Dynamics calibration. If the problem remains, reduce the outer-wall speed or acceleration. With small technical parts, a clean corner is more important than a record print time.
Check Flow Rate. An over-extruded top surface means too much material; gaps mean too little material or too few top layers. Lowering the top-layer speed may also help.
Increase the temperature, reduce the speed, check the volumetric flow and dry the filament. For strength-oriented parts, use more walls and the correct model orientation.
Clean the plate, check the bed selection in Bambu Studio, and start leveling. If the corners are coming off, add a brim and reduce drafts.
After a few weeks of use, you may have many custom profiles in Bambu Studio. If you do not name them sensibly, you will quickly lose track. I recommend a simple format:
Materiál - značka/barva - účel - tryska
For example:
PLA - černé matné - detail - 0.4PETG - transparentní - pevnost - 0.4ASA - venkovní díly - 0.4TPU 95A - pomalu - 0.4When you change only the process, name it according to the result: 0.20 rychlý prototyp, 0.16 hladký povrch, 0.24 pevný díl.test2 final opravdu final, which no one will understand a month later.
For regular printing with PLA using a 0.4 mm nozzle, start with the following:
With PETG, place greater emphasis on drying, use more cautious cooling, and keep the plate clean. With ASA and ABS, address the environment around the printer, not just the slicer. With TPU, slow down and do not try to print at PLA speeds.
Bambu Studio can automate many things, but the best results come when you know which setting addresses which problem. For a new filament, create a simple routine: the correct profile, first layer, Flow Dynamics, Flow Rate, then temperature and speed.
If the print does not turn out well, do not change ten values at once. Identify the symptom, adjust one thing, and print a small test. This calm approach is the difference between random tweaking and repeatable printing.


